Ultrasonic sensor controlling some LEDs
In this exercise we'll be using a ultrasonic HC-SR04 sensor to control some LEDs as a prototype idea for further elements to be controled upon the same concept.
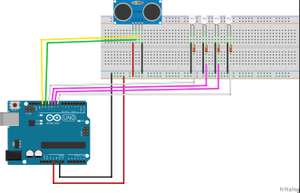
In this case, we're going to simulate that we have some kind of a "gate" of light, consisting on 4 LEDS, two of wich will be turned off when something (or somebody) approaches to less than 30 cm of them.
The problem that we have in order to program our arduinos to work with this ultrasonic sensor, is that firefly doesn't have any tool to make it work. So we'll have to use a workaround. We'll use a handler and after programming the rest of the elements, we'll use the "code generator" component on firefly to save the code. Afterwards, with the arduino IDE, we'll modify the code to add the lines changing the handler for the sensor values.
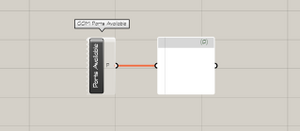
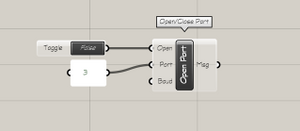
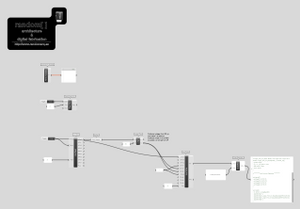
We'll start by opening grasshopper and inserting the first components of firefly to check the ports avaliable and to open the port where our arduino is connected.
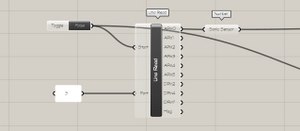
After inserting a "Uno Read" component, we attach a "number" component to the Analog Pin 0 output. This will serve us later as a handler on the code, that we'll have to substitute with the value input from the ultrasonic sensor.
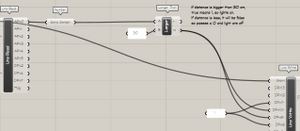
The value that we will get from the sensor, will be pased to a "larger than" component, to check if the distance detected is bigger than a value that we'll set up as the trigger for the lights. With this code, if the distance detected by the sensor is bigger than the one selected, we'll get a "true" - so the inputs connected will be getting a digital true - and the leds connected on those pins will be on. If the distance is smalles, it will return a "false" and the leds will go off.
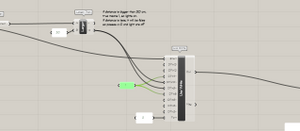
Add a "Uno Write" component to the canvas, and set up four digital inputs, two of them connected to a "1" state, so will be always on, and another two connected to the "larger than" output. In this example, we'll be using pins 8 and 11 as "always on", and pins 9 and 10 as controlled by the ultrasonic sensor.
Once we have our snippet of code configured, add to the canvas a "Code Generator" component, and connect the input with the "out" output from the "Uno Write", and set up a path for the folder with the arduino code to be saved in in the "path" input. If you connect a panel to the output of the component, you should be seeing the arduino code generated.
At this point, in the folder that you defined, you should have two files, one with the name of the folder and extension .ino, and another one called Ffcasts.h. If this is the case, you can already close grasshopper and Rhino, we've finished our programming with it. If you dont have both files, check the grasshopper definition, that everything is connected the right way and that the port is open and the components working.
Now, we have to import in the arduino IDE the library needed to use the ultrasonic sensor. You can find online some libraries, in this excersise we'll be using one called "Ultrasonic" developed by Erick Simoes. You can download the library in .zip format from the github page (https://github.com/ErickSimoes/Ultrasonic) where you can find a lot of information about it, or you can download the file directly HERE.
To import the library, open the Arduino IDE, and follow the next steps:
- Click in Sketch > Include library > Add .ZIP library
- Navigate to the .zip file's location and open it
- Return to the sketch > include library menu and now you should see the library at the bottom of the drop-down menu
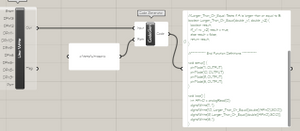
And now, we can open our code and modify it to use the sensor. Open on the Arduino IDE the file with the .ino extension created by grasshopper. you should see something like this:
/*Firefly Code Generator by Andy PayneCopyright 2011 All Rights ReservedCode Generated on 11/14/2017 10:12:19Special thanks to Panagiotis Michalatos.For more information visit: www.fireflyexperiments.com*/#include "FFCasts.h"//******************* Begin Function Definitions *******************//Larger_Than_Or_Equal: Tests if A is larger than or equal to B.boolean Larger_Than_Or_Equal(double _v1, double _v2) {boolean result;if(_v1 >= _v2) result = true;else result = false;return result;}//******************** End Function Definitions ********************void setup() {pinMode(11, OUTPUT);pinMode(10, OUTPUT);pinMode(9, OUTPUT);pinMode(8, OUTPUT);}void loop() {int APin0 = analogRead(0);digitalWrite(11, 1);digitalWrite(10, Larger_Than_Or_Equal((double)(APin0),30.0));digitalWrite(9, Larger_Than_Or_Equal((double)(APin0),30.0));digitalWrite(8, 1);}
Now, go to File > Examples > Ultrasonic (it will be at the bottom) and select the "UltrasonicSimple" sketch. It will open in a new window with an example of how to use the library. It will look like this:
#include <Ultrasonic.h>Ultrasonic Ultrasonic(12, 13);void setup() {Serial.begin(9600);}void loop() {Serial.print("Distance in CM: ");// Pass INC as a parameter to get the distance in inchesSerial.println(Ultrasonic.distanceRead());delay(1000);}
With this example, we can see how it works and how do we have to modify our code to use the sensor (with this library, by default, the sensor will be using pin12 as the trigger and pin 13 as the echo receiver. So well use the same on our design).
We will copy on each section of our code the corresponding code from the example, and taking a look to the code, we can see that the distance from the sensor comes throug the command "Ultrasonic.distanceRead()", so we will change the value of the variable APin0 that we used as a handler, for that command. We will end with a piece of code like this (in bold, the additions and modification over the original code):
#include "FFCasts.h"#include <Ultrasonic.h>Ultrasonic Ultrasonic(12, 13);//******************* Begin Function Definitions *******************//Larger_Than_Or_Equal: Tests if A is larger than or equal to B.boolean Larger_Than_Or_Equal(double _v1, double _v2) {boolean result;if(_v1 >= _v2) result = true;else result = false;return result;}//******************** End Function Definitions ********************void setup() {Serial.begin(9600);pinMode(11, OUTPUT);pinMode(10, OUTPUT);pinMode(9, OUTPUT);pinMode(8, OUTPUT);}void loop() {Serial.print("Distance in CM: ");Serial.println(Ultrasonic.distanceRead());int APin0 = Ultrasonic.distanceRead();digitalWrite(11, 1);digitalWrite(10, Larger_Than_Or_Equal((double)(APin0),30.0));digitalWrite(9, Larger_Than_Or_Equal((double)(APin0),30.0));digitalWrite(8, 1);delay(1000);}
You can check the distance detected by the sensor, if you go to the arduino IDE and press the button on the top right to open the serial monitor. A new window will appear where it will be printed the distance detected by the sensor.
Here you can see a video showing this sketch at work:
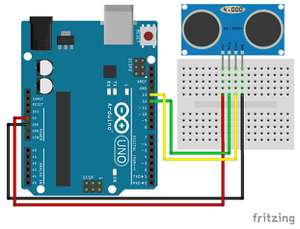
Here you can see how you have to connect the sensor to the arduino: